-
Next.js - SSR, getServerSideProps 적용하기React.js, Next.js 2022. 9. 18. 20:30

Data Fetching: getServerSideProps | Next.js
Data Fetching: getServerSideProps | Next.js
Fetch data on each request with `getServerSideProps`.
nextjs.org
정의
getServerSideProps 라는 함수를 한 페이지 내부에서 export할 경우, Next.js는 getServerSideProps 에 의해 반환되는 각 페이지 별 요청에 따른 데이터를 pre-render 할 것입니다.
export async function getServerSideProps(context) {
  return {
    props: {}, // will be passed to the page component as props
  }
}
getServerSideProps 메서드는 오직 서버-사이드에서만 동작하며 브라우저에서는 절대 동작하지 않습니다. 만약 getServerSideProps 메서드를 사용한다면 해당 페이지에서는 다음과 같이 사용합니다:
- When you request this page directly,
getServerSidePropsruns at request time, and this page will be pre-rendered with the returned props - When you request this page on client-side page transitions through
[next/link]or[next/router], Next.js sends an API request to the server, which runsgetServerSideProps
getServerSideProps 메서드는 JSON 데이터를 반환하며 이 데이터는 각 페이지에 렌더링되기 위해 사용될 것입니다. 이 모든 작업 들은 Next.js 에 의해 자동적으로 핸들링되기 때문에, getServerSideProps 메서드에 대해 정의하려고 추가적인 시간을 가지지 않아도 됩니다.
getServerSideProps 라는 함수 이름으로 export 할 경우, Next.js 에 의해 자동적으로 SSR 을 실행합니다. 요청에 의해 생긴 데이터는 서버사이드에서 동작하며 브라우저에서는 동작하지 않습니다.
언제 사용할까?
getServerSideProps 메서드는 매 요청 마다 데이터가 반드시 패칭되어야 하는 페이지를 렌더링해야 할 때 사용할 수 있습니다.
getServerSideProps 를 사용하는 페이지들은 매 요청 마다 서버사이드에서 렌더링될 것이고, 캐시 컨트롤 헤더가 구성되어 있을 때만 캐싱 됩니다. (only be cached if cache-control headers are configured)
getServerSideProps 사용하기
function Page({ data }) {
  // Render data...
}

// This gets called on every request
export async function getServerSideProps() {
  // Fetch data from external API
  const res = await fetch(`https://.../data`)
  const data = await res.json()

  // Pass data to the page via props
  return { props: { data } }
}

export default Page
Server-Side Rendering 로 캐싱하기
// This value is considered fresh for ten seconds (s-maxage=10).
// If a request is repeated within the next 10 seconds, the previously
// cached value will still be fresh. If the request is repeated before 59 seconds,
// the cached value will be stale but still render (stale-while-revalidate=59).
//
// In the background, a revalidation request will be made to populate the cache
// with a fresh value. If you refresh the page, you will see the new value.
export async function getServerSideProps({ req, res }) {
  res.setHeader(
    'Cache-Control',
    'public, s-maxage=10, stale-while-revalidate=59'
  )

  return {
    props: {},
  }
}
다이나믹 라우팅에 SSR 적용하기 예시
사용할 디렉터리 구조는 다음과 같습니다
- pages
    - movie
      - [name].tsx     // params name 프로퍼티를 통해 SSR 을 진행할 컴포넌트
      - index.tsx      // 초기 검색을 위한 준비 컴포넌트
- next.config.js     // next image 사용을 위한 도메인 설정
index.tsx
영화를 검색하는 상황을 가정합니다. 단순 검색 및 해당 state로 라우팅하는 코드는 다음과 같습니다.
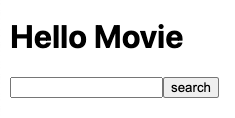
const Movie = () => {
  const [input, setInput] = useState('');

  const onSubmit = useCallback(
    (e: React.FormEvent<HTMLFormElement>) => {
      e.preventDefault();

      location.href = `/movie/${input}`;
    },
    [input]
  );
  return (
    <div>
      <form onSubmit={onSubmit}>
        <h1>Hello Movie</h1>

        <input type='search' value={input} onChange={(e) => setInput(e.target.value)} />

        <input type='submit' value='search' />
      </form>
    </div>
  );
};

export default Movie;
[name].tsx
우선 getServerSideProps 코드를 먼저 보겠습니다.
export async function getServerSideProps(context: GetServerSidePropsContext) {
  // console.log('context:', context);

  const res = await fetch(
    `https://api.themoviedb.org/3/search/movie?api_key=${REACT_APP_API_KEY}&language=en-US&query=${context.params?.name}}`
  );

  const data: Imovie = await res.json();

  return { props: { data } };
}
구조는 위에 설명한 구조와 같습니다. fetch 함수를 통해 api 요청을 보내고 해당 데이터가 온전히 전달되었다면, json으로 반환하여 props로 반환합니다.
사용한 API 는 영화 데이터를 무료로 제공하는 사이트인 TMDB 입니다. 실제로 따라하고 싶은 경우 해당 사이트에 회원가입 이후 키 값을 넣어주세요. 우리가 봐야할 부분은 쿼리 부분입니다.
&query=${context.params?.name}Next.js에서 제공하는 메서드인 getServerSideProps 는 context를 가지고 있습니다. 이 context에는 다양한 정보들이 들어있는데, 우리가 index.tsx에서 location.href 로 전달한 input 값이 context.params 내부에 [name].tsx 에 의해 name 프로퍼티로 존재하게 됩니다.
location.href = `/movie/${input}`;

[name].tsx
주석 처리한 Context 중 필요한 정보가 있는 부분을 찍어보겠습니다.
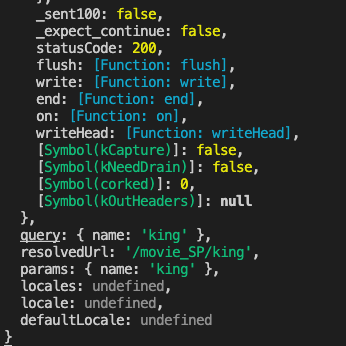
서버-사이드에서 데이터를 제공하기 때문에 context 는 터미널에서 볼 수 있습니다. params 라는 객체 내부에
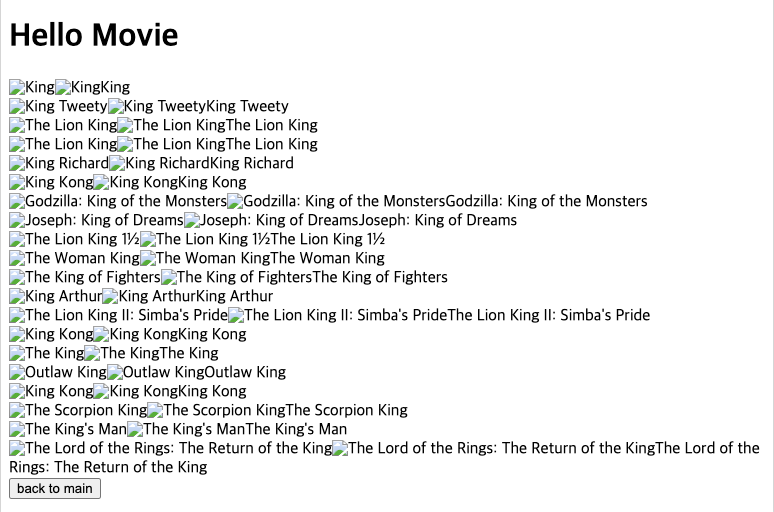
name: ‘king’이라는 검색 결과가 들어 있습니다. 사용자의 input 값을 context.params.name 으로 접근하여 데이터를 불러옵니다.// types/movie/index.ts interface ImovieResults { adult: boolean; backdrop_path: string; genre_ids: string[]; id: number; original_language: string; original_title: string; overview: string; popularity: number; poster_path: string; release_date: string; title: string; video: boolean; vote_average: number; vote_count: number; } export interface Imovie { page: number; results: ImovieResults[]; total_pages: number; total_results: number; }interface IDynamicMovie { data: Imovie; } const DynamicMovie = ({ data }: IDynamicMovie) => { const { results } = data; if (!results.length) return <div>There is no data.</div>; return ( <> <div> <h1>Hello Movie</h1> <div style={{ display: 'flex', flexWrap: 'wrap' }}> {results.map((movie) => ( <div style={{ marginTop: 5, display: 'flex', marginRight: 10 }} key={movie.id}> <div style={{ position: 'relative', color: 'white' }}> <Image width={250} height={200} src={ movie.backdrop_path ? `https://image.tmdb.org/t/p/original/${movie.backdrop_path}` : `https://freesvg.org/img/1645699345cat.png` } alt={movie.title} /> <span style={{ position: 'absolute', top: 5, right: 5, textShadow: '#000 1px 0 10px', }} > {movie.title} </span> </div> </div> ))} </div> </div> <button type='button' onClick={() => (location.href = `/movie_SP`)}> back to main </button> </> ); }; export default DynamicMovie;서버-사이드 결과
하지만 해당 코드를 그대로 복사 붙여넣기 한다면, 오류를 일으킬 가능성이 큽니다.
Next Image 를 사용하기 위해서는 정적인 경로(static path) 에 저장되어 있는 것이 필요합니다.
- public 폴더에 저장하는 방법
- 정적 저장소에서 이미지 주소를 불러오는 방법
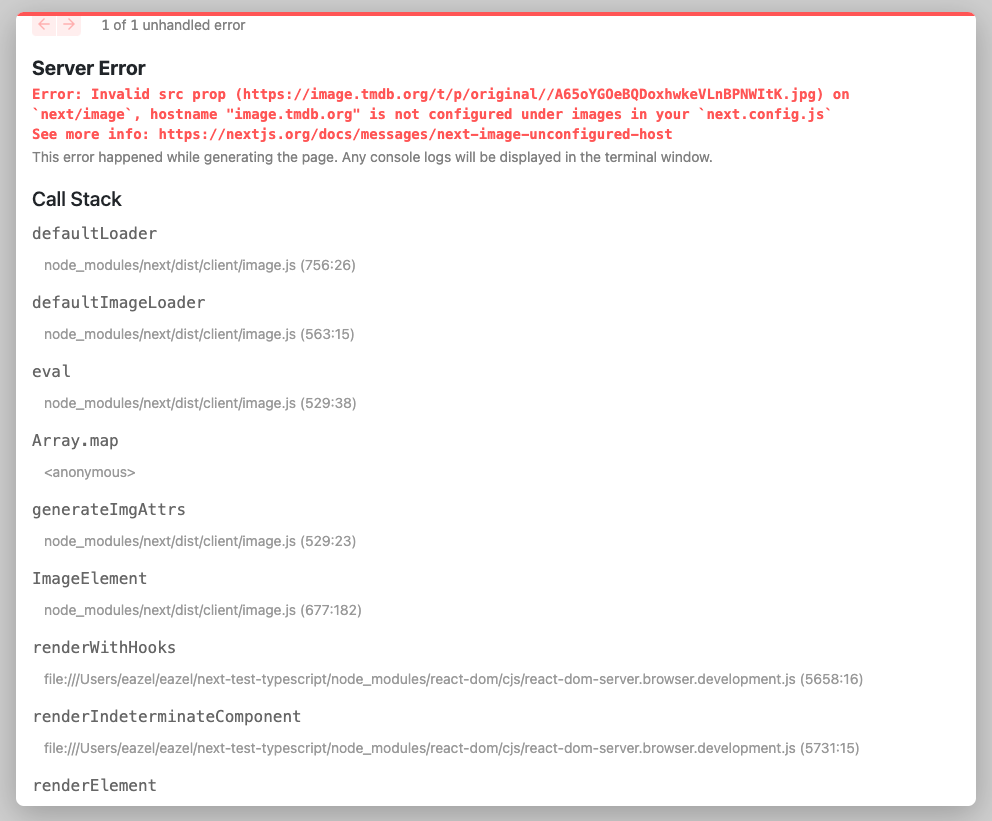
우리는 두 번째 방법을 선택할 것입니다. TMDB 에서 사진을 제공하기 위해 저장된 경로를 next.config.js에 추가합니다.
images 프로퍼티에 대한 자세한 정보는 공식 문서를 참고해주세요.
Similar to
[remotePatterns](https://nextjs.org/docs/api-reference/next/image#remote-patterns), thedomainsconfiguration can be used to provide a list of allowed hostnames for external images.However, the
domainsconfiguration does not support wildcard pattern matching and it cannot restrict protocol, port, or pathname.Below is an example of the
domainsproperty in thenext.config.jsfile:module.exports = { images: { domains: ['assets.acme.com'], }, }코드에 적용하기 (next.config.js)
/** @type {import('next').NextConfig} */
const nextConfig = {
  reactStrictMode: true,
  swcMinify: true,
  images: {
    domains: ['image.tmdb.org', 'freesvg.org'],
  },
};

module.exports = nextConfig;
결과 보기

[name].tsx 전체 코드
import { GetServerSidePropsContext } from 'next';
import Image from 'next/image';

import { REACT_APP_API_KEY } from 'config';
import { Imovie } from '@/types/movie';

interface IDynamicMovie {
  data: Imovie;
}

const DynamicMovie = ({ data }: IDynamicMovie) => {
  const { results } = data;

    if (!results.length) return <div>There is no data.</div>;

  return (
    <>
      <div>
        <h1>Hello Movie</h1>

        <div style={{ display: 'flex', flexWrap: 'wrap' }}>
          {results.map((movie) => (
            <div style={{ marginTop: 5, display: 'flex', marginRight: 10 }} key={movie.id}>
              <div style={{ position: 'relative', color: 'white' }}>
                <Image
                  width={250}
                  height={200}
                  src={
                    movie.backdrop_path
                      ? `https://image.tmdb.org/t/p/original/${movie.backdrop_path}`
                      : `https://freesvg.org/img/1645699345cat.png`
                  }
                  alt={movie.title}
                />
                <span
                  style={{
                    position: 'absolute',
                    top: 5,
                    right: 5,
                    textShadow: '#000 1px 0 10px',
                  }}
                >
                  {movie.title}
                </span>
              </div>
            </div>
          ))}
        </div>
      </div>

      <button type='button' onClick={() => (location.href = `/movie_SP`)}>
        back to main
      </button>
    </>
  );
};

export default DynamicMovie;

export async function getServerSideProps(context: GetServerSidePropsContext) {
  // console.log('context:', context);

  const res = await fetch(
    `https://api.themoviedb.org/3/search/movie?api_key=${REACT_APP_API_KEY}&language=en-US&query=${context.params?.name}}`
  );

  const data: Imovie = await res.json();

  return { props: { data } };
}
에러 핸들링하기
getServerSideProps 내부에서 에러가 발생한다면, Next.js 프레임워크는 pages/500.js 파일을 보여줄 것입니다.
// 🗂 pages/500.js export default function Custom500() { return <h1>500 - Server-side error occurred</h1> }'React.js, Next.js' 카테고리의 다른 글
Next.js - CSR, Client side data fetching (0) 2022.09.18 Next.js - SSG, getStaticProps (0) 2022.09.18 Next.js - 초기화 이후 기본 구조 설정하기 (0) 2022.09.18 리액트에서 다수의 체크 박스 다루기 (0) 2022.09.13 스타일드 컴포넌트 조건부 렌더링 활용하기 (0) 2022.08.26 - When you request this page directly,