Poofiemus Posted July 29, 2022 For those of you not in the TinyFox thread, I have decided to make a custom doll of this shameless little hedonist: This is Paimon, an NPC from Genshin Impact. She's hilariously obnoxious, but as you can see. . . Genshin outfit designs have NO chill, so this is definitely a project. First, the doll: I chose a Tinyfox new body 1/6 doll. I picked the head TinyFox used for their Frog doll; it was available blank with body from a couple other dealers. Next, one of the trickier parts of the project: her crown and cuffs, what I have taken to collectively calling her "hard goods". I really wasn't sure how I wanted to do this for quite a while; a lot of commercial cosplays use either pleather, which will eventually peel, or felt, which just looks cheap to me in this context. I considered EVA foam, but I've never done foam smiting and was really, really worried I wouldn't be able to do the artwork justice. Then I was perusing Etsy and found a 3D shop called Dangerous Ladies that had a model of Paimon's hard goods for sale. I PM'd them, and their 3D artist helped me out a TON in getting the parts scaled to fit the doll and then printed! Here's a screenshot of the final model prior to printing. Prints have shipped from Canada to the US and were last scanned entering Chicago customs. If the parcel clears as expected, I should have these pieces in hand late next week. I'll have a LOT of sanding and priming and painting, but that's all stuff I'm familiar with from lots of other projects, lol. Eyes and wig were also lucky Etsy finds. Eyes I found at a shop called Aruna's Aestherics (she has Eyes for basically every Genshin character), and the wig came via a shop named Sophie's Toy Paradise. So here's an admittedly poor shot of Paimon so far lol. I decided to still learn one brand new skill for this project, and that's hand embroidery. There's a lot of weird details on the actual fabric parts of her outfit and I felt that would be the best way to depict them. I've kind of been getting close to needing embroidery skills a few times, so frankly it feels like learning it was inevitable, lol. I'm doing a couple pieces as appliques, since they'll be right over seams in the outfit. I've had to redo them a couple times, but the improvement has been kind of drastic. Here's the applique for the right hip, second attempt versus fourth: I've had to wait for the 3D print parts to draft her jumpsuit, since the sleeves have to fit the pieces pretty precisely, and real life crap has sadly gotten in the way of doing her faceup. Stupid real life. i'll keep you all posted as this goes along. Hopefully things will be quiet at work so i can get some progress done between calls, lol! 8 In this household, sanity is considered a tresspasser. Share this post Link to post Share on other sites
Poofiemus Posted August 12, 2022 Okay, an update! Paimon finally has a face! It was a bit of a journey though, not gonna lie. Looks like I'll have to break this up into a few posts, so buckle up for this ride on thr Struggle Bus. I started by sketching eyelashes and eyebrows with watercolor pencil. This part went well, because honestly it's familiar territory--I've had to do it on basically every other faceup I've ever done. Just had the usual slight struggles with symmetry. But then I had to sketch in her mouth, and this was the first time I've done an open mouth doll. I had to try like 4 times just to get it centered. Why. Why was this so hard? Finally got something sketched in I liked! I decided to fill it in with watercolor pencils a bit to see if I still liked it in full color. And I was like, this is it, I've got it! This is the vibe for our floating chaos goblin. Time to commit this into paint. And of course, I wound up struggling AGAIN with paint. . . 1 In this household, sanity is considered a tresspasser. Share this post Link to post Share on other sites
Poofiemus Posted August 12, 2022 So on the paint phase, I once again had great success with eyebrows and eyelashes, but then I did the mouth. It was around this point i had to stop for a day or two to decide exactly WHAT about the mouth I hated, and how to fix it. Obviously thr black outlines were a mess, but there was more to it. . .after looking closer at game screenshots, I realized that the inside of character's mouths are honestly pretty pale, so the second layer of watercolor pencils I did made things too dark. I also realized while you sometimes see teeth, you never distinctly see the tongue. I'm not sure if the in game character models really HAVE modeled tongues; for tongue out expressions the tongue is so small it may actually just be a texture map. So that left me with two options: Wipe the mouth, and hope the MSC/spray sealant didn't leave too much "scarring", or just paint over it. I decided to at least try the latter, and use the removal option as plan B. Unfortunately the first attempt went very poorly. YEESH. I had been trying do hard to get coverage, I accidentally did imposto and made it look like she had a pacifier. I know Paimon's immature but she's not an infant, yikes. Right after this picture, i scraped the pacifier-mouth off. Serendipitously, the paint was still a little damp and that must have softened the dark layers of paint underneath. It didnt do anything for the red of the watercolor pencil, but at least it let me take thr stupid black outline off. Attempt 2, I did two much thinner coats, AND very gently buffed those coats with 1000 grit sandpaper. This result was (thankfully) a winner! (Side note, I love how this shot really shows the holographic effect layer in her eyes. Totally worth the extra $5 fee!l What's neat is that you can still see juuuust a little of the watercolor pencil on the edge, giving it a soft outline. At first I wasn't sure if I wanted to add shading back in, but after re-capitating her and looking closer at in-game mouths again, I was like, naw, this is actually right. 1 In this household, sanity is considered a tresspasser. Share this post Link to post Share on other sites
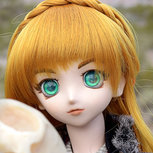
Poofiemus Posted August 12, 2022 (edited) Before the last bit of the update, have a re-capitated shot! "Paimon thinks being headless was total baloney! Don't do it again, or Paimon won't share snacks with you!" Obviously her wig still needs a LOT of styling but at least she FEELS like Paimon now! An actual update: 3D printed parts from Dangerous Ladies are in! (Not all parts are shown, some just don't have a good way to "dry fit".) I was pleasantly surprised to find these are resin prints; for some reason i assumed they were going to be PLA? But resin does mean a bit less finishing work for me. Now that I have the parts, I can draft the outer jumpsuit to scale with them. I'm honestly at a bit of a loss on how to attach these parts to her clothes. Drill tiny holes and sew them on? Glue them on? Sew felt patches to the jumpsuit, and glue the parts to the felt patches (spread the weight more, and make it so there's less marring if I need to remove them)? Velcro? I'm hoping the potential answer becomes clearer as I put the actual outfit together. The crown at least is going to attach via magnet, one on her head under the wig and one smaller one at thar sticky-down pointy bit in front--the one poking into her bangs. That's where the crown attaches to tye head on the 1/7 figure version of Paimon, and I think the crown part is light enough for this to work. I'm out of town, so i'm away from my primers and paints, but I may be able to squeeze in some jumpsuit drafting. At the least I hope to get some photos of Paimon being a blatant tourist lol. Edited August 12, 2022 by Poofiemus Forgot a thing 8 In this household, sanity is considered a tresspasser. Share this post Link to post Share on other sites